Return to the SDK's Welcome page
Common Car Textures
In Crashday's rendering engine, every texture does exactly represent one material. That means, a texture will always be shaded and rendered in a certain way (and only in that way). If you, for example, had a glass texture on your car, it will automatically be reflective in-game, even if you don't set up any material parameters. In your modelling application, you don't have to care about materials at all. They are set up later by simply creating associated material files for your car's textures.
A vehicle in Crashday usually has the following textures applied:
| body1.tga | car colored metallic body |
| body2.tga | only used if space in body1 is really enough enough (e.g. tuning parts) |
| misc.tga | non-reflecting miscellaneous parts (usually interior and car bottom) |
| lights.tga |
reflecting light parts and overlay glow texture |
- Alternatively to having 2 body textures, you can merge them to one bigger texture to save rendering batches
Related damage maps are modified versions of the original ones:
| body1_2.tga | damage map counterpart of body1.tga |
| body2_2.tga | damage map counterpart of body2.tga |
| misc2.tga | damage map counterpart to misc.tga |
| lights2.tga | damage map counterpart to lights.tga |
In addition to these car unique textures, Crashday features a list of so-called “shared textures” which exist in Crashday's default texture folder [crashday]\textures. They can freely be referenced to by any car. These textures shall help to reduce development time for cars by predefining commonly used materials instead of recreating them again and again for new cars (see Existing materials overview) for acomplete list of shared car materials.
- Please refer to Textures and shaders for detailede information on the texture size, texture format, folders and shader files.
The body texture
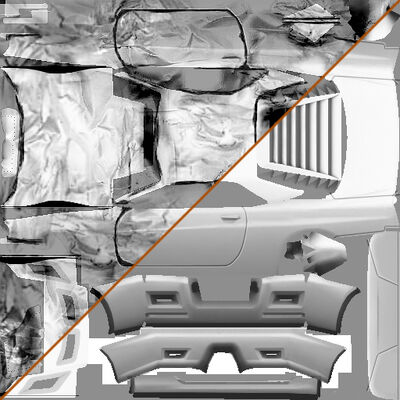
The base texture for a car is the „body” texture. It is used for any parts that are of car metal and whose color can be changed. While the „misc” and “lights” textures will mostly be made up of photos, the „body” texture's details are drawn into by hand (e.g. the door lines).
„Pre-shading“ the textures (“baking”):
All car textures in Crashday are pre-illuminated by texture “baked” Radiosity / Global Illumination. Cars with preshaded textures feel much more realistic, heavier and more solid. Furthermore, they seem much smoother (as if they are built with more polys) and the shading accentuates all contours in a car's shape. It is important to first find the right lighting setup so that baked shadows look the same for all cars. As you can see on the „body texture“ illustration below, the brightest body color for face normals heading up vertically is plain white (255, 255, 255). The body color for faces normals heading to the side is about (160, 160, 160). Those two parameters should be sufficient to „imitate“ the Radiosity lighting setup from the reference texture.
Damage textures

Damaged and original body texture

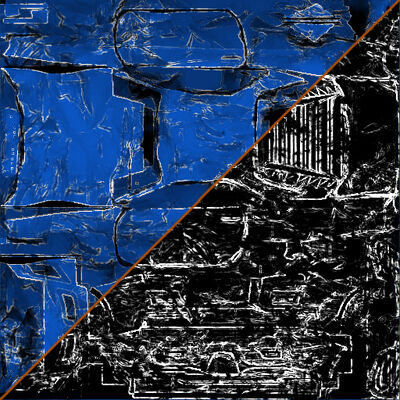
Advanced damage texture with scratches in alpha channel
The visual damage effects in Crashday are actually made up of two basic modifications on the model. Firstly, a model deformation done by bringing the vertices of a model in disorder (in-game effect), and secondly replacing the original car textures at the affected areas by so called damage textures.
Every texture used on a car (e.g. „body“, „misc“, “lights”) should have a damage map counterpart that is displayed on areas that have been hit in-game (usually with the suffix “2” like „body2“ or „misc2“). Damage maps are created in a graphics application once the „clean“ versions are done, using these as your base pictures. The association of damage map textures to the „source textures“ is done by setting certain parameters in Crashday's .cca files (see Setup of car specificiation file).
For creating the dents, we advise to collect several photos of (mostly white) damaged cars and make up a collection of greyscale „dent images“ which are layed over the base texture several times additively and substractively. That allows to brighten up and darken the texture.
Take care that the average brightness level of the damaged textures is nearly the same as the base texture because otherwise you will see ugly seams on partly damaged cars. Crashday does have no alpha interpolation from source to damage texture.
- Less splitted UV-coordinates help to avoid seems when the damage texture replaces the original texture.
- Advanced damage maps are using an alpha channel and are applied as decal on the base texture to realize bright scratches on the colored body. (see Applying Vinyls in this chapter)
Mapping glass parts

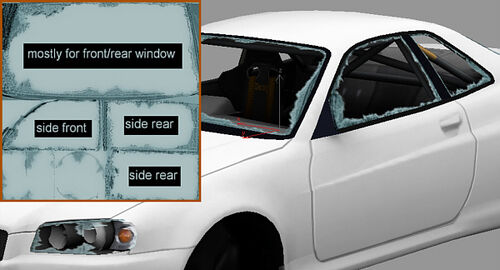
Correct UV mapping for glass parts; glass2.dds (upper left)
As described Crashday cars usually share certain textures. One of them is the glass texture „glass.dds“ (and its damage map counterpart „glass2.dds“). There is no need to create a new glass texture for every car, except you like to create darkened glass or other modifications on the window.
Although the glass and most other shared textures are just a plain color you should take care of how you map the UV coordinates to the meshes, because the associated damage textures are not just a single color. For damaged parts the correct look on the windows parts is important.
Applying vinyls

Blue stripes vinyl with alpha channel
If a texture can be color-changed in-game (mostly body1.tga and body2.tga) it can have vinyls applied to it. (see Setup of car specificiation file for vinyl texture association)
When a vinyl is applied to a default texture by a tuning kit, only the areas masked out by the alpha channel (white pixels) are replaced with the vinyl color. The rest stays original and is still capable of color changing.
Using vinyls for advanced damage maps
In Crashday every vehicle (that can be color changed) has a decal by default that changes nothing on its appearance but gives the option of simulating bare blank metal where the color is scraped off.
The “clean” body texture is replaced with itself. But be sure to mask out a non visible area on the texture. The body's damage map is replaced with itself too. But this time the alpha channel is responsible for the scratches on the surface (see damage textures). As just mentioned, bright pixels on decals won't change their color any more. So this will look like bare metal in-game. To improve this effect you can change the “decalcolor” to “B4B4B4” (a bright grey).
Car shadow bitmap

Shadow.tga alpha channel
Crashday displays a static shadow directly below the vehicle. This shadow is just a texture that is stored in the car's folder and associated to the car by the .cca descriptor file. To achieve best results this shadow has to be created by using Radiosity/Global Illumination rendering again as done for the texture preshading already.
Look at the upper shot what this „GI shadow“ should look like. As you will build cars without wheels you should at least create some cylinder or something similar as a wheel replacement to render and bake the shadows properly including the (quite important) wheel shadows.
An appropriate texture format for most ground shadow textures is 128x256 with the car's front heading towards to upper picture border. The texture itself is simple black, but the shadow data is stored into the alpha channel.
- In general while car texturing, keep the number of different textures on each mesh as low as possible to reduce the batch count and thus improve the performance. The number of batches required to render one car body is calculated as follows: number_of_meshes * number_of_textures_on_each_mesh
